- Home
- Fishing Rigs
- Bait Rigging
Bait Rigging Small Fish - To Catch Larger Ones!
Before bait rigging one of these, let's first spare it a moment's thought, because it must be a tough old life being something like a sardine. They're
far too popular for their own good. Bass, tuna, wahoo, mahe-mahe, billfish, dolphins and
whales - they all love them. And I'm a bit partial to grilled ones
myself...
But we're not just talking sardines here. Other baitfish for which this rigging method applies include herring, sprats, mackerel and flyingfish along with larger baitfish such as bonito.
The notable exception here is ballyhoo, not because it's inferior in any way - it isn't, it's one of the best baitfish of all - but because its elongated beak has earned it a special rigging technique.
But whatever the baitfish, it must first be properly prepared - 'limbered up' - for trolling before the bait rigging process begins.
It's most likely that rigor mortis will have left your baitfish stiff and slightly curved, so although it may smell right, it won't look right when trolled astern.
A fish that may otherwise have grabbed it without hesitation is now more likely to ignore it altogether.
Here's how to make sure it will behave as it should ...
Preparing the Baitfish for Bait Rigging
To resemble their living brethren, dead baitfish must 'swim' convincingly when towed astern - they should wriggle, but not spin. And for a lifelike wriggle, the baitfish must be flexible. And here's how to make it so ...
- First, empty the gut cavity by squeezing firmly with thumb and forefinger along the belly towards its anal vent;
- Then, pinch the baitfish progressively along its backbone to detach the flesh from the bone, but take care not to break the skin. Flex it back and forth a few times to complete the loosening up process;
- Next, remove the eyes. Otherwise, water pressure may cause them to bulge unequally, inducing rotation. A small wooden dowel is ideal for pushing them out of their sockets;
- Finally, trim off the pectoral (unless it's a flyingfish, more of which later) and pelvic fins. Any unequal projection here and a propeller effect will be set up.
Now your baitfish is limp and flexible, and ready for rigging.
The Bait Rigging Method Used By Professionals
Having loosened up the baitfish, the rigging process can begin.
I've shown a sardine here, but most baitfish - herring, joey mackerel, sprats, pilchard and with a small adjustment, flyingfish - can be rigged in the same way.
First, you'll need to decide on the leader material. Mono will allow the bait to work most convincingly, and will get the most hits as a result. But if you think a wahoo or some other toothy fellow may put in an appearance, wire would be a better choice.
Use plastic covered seven-strand wire, as single strand wire doesn't lend itself to this technique. To get the hook in the right place, you'll need a baiting (or rigging) needle. This is a length of stainless wire, around 250mm long with a point on one end and an open eye at the other. So, let's get started ...
Stage 1
First, having decided on the leader material, select a large hook, about one third the length of the bait. Use the sharp end to mark the point, exactly on the centreline of the baitfish's belly, at which the hook will emerge.
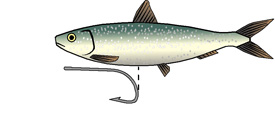 Stage 1 - Where to insert the hook
Then attach it to a baiting needle as shown, and insert the baiting needle at the point you've just marked before pushing it through and out of the mouth of the baitfish.
Stage 2
Next, pull the hook into the sardine's mouth and detach the needle.
Then
slide a crimp onto your leader, attach the baiting needle and push the
needle through the baitfish's head on the centreline, through the eye of
the hook and out vertically below the point of entry.
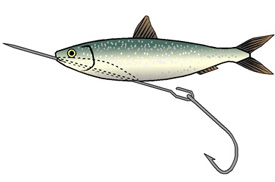 Stage 2 - Using the baiting needle
Stage 3
Now remove the needle, and push the leader through the path taken by the
needle, including of course through the eye of the hook.
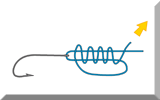
Pull the end of the leader through and into the crimp, slide the crimp back close to the mouth and nip off the excess line.
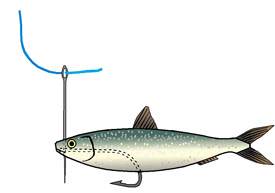 Stage 3 - Attaching the leader
Stage 4
Finally, with the bait rigging process complete, eyeball the sardine head-on. The hook and the loop must all be on the centreline in the vertical plane, or it will spin.
Hold the leader and let the bait hang down.
 Stage 4 - Crimp up, and you're ready to fish.
Artwork by Andrew Simpson
Check! Is the hook pulling on the belly? If so, carefully cut a longitudinal slot at the point of entry with a sharp knife so that the hook can move freely.
If you've done the bait rigging properly, the sardine will be towed by the head loop and won't spin. Try it, and if it does, tweak the rig until it doesn't - or start again.
As a final embellishment you could slide a lure - such as sea witch, trolling feather, straight runner, clone, jethead or simply an octopus skirt - down the leader so that it locates against the nose of the baitfish.
But What if Your Baitfish is a Flyingfish?
When Mary and I crossed the Atlantic on our sailboat Alacazam, one of the first tasks at daybreak was to scour the decks for any flyingfish that had 'flown' aboard overnight.
If there were a couple of decent sized ones, then they were breakfast. Any others were destined for the trolling line.
Incidentally, flying fish can't be said to 'fly' as they don't flap their wings - but they do glide considerable distances to outmanoeuvre their pursuers.
And to be strictly correct they don't have wings either - they're just extended pectoral fins. But we'll call them wings.
Rigging a Flyingfish for Trolling
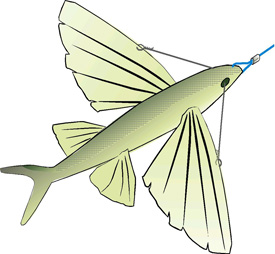 Like a sprat - with wings!
Of course, you could just cut of its wings - the pectoral fins - and rig as for a standard baitfish as described above. Alternatively, you could try this final embellishment...
- Extend its wings and hold them in position with soft rigging wire;
- Poke one end through the leading edge of a wing, secure it with a haywire twist;
- Run the wire through the head via the eye sockets and attach to the other wing in the same way.
Trolled astern, this bait will behave very much like the real thing - sometimes submerged, at other times skipping along the surface and even taking short flights.
You shouldn't have long to wait ...
The Bait Rigging Tools You'll Need...
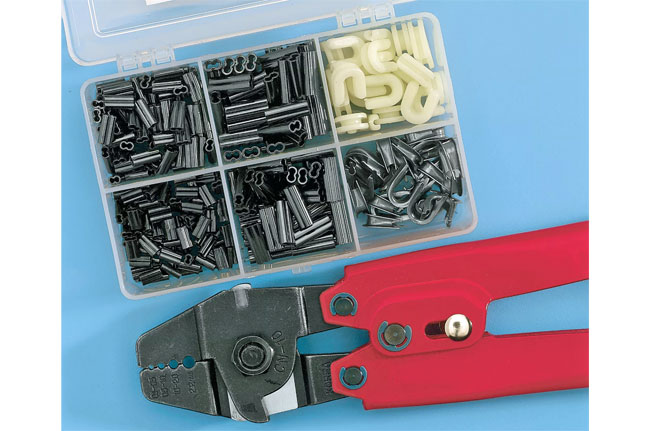
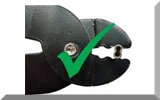
If you haven't already got it, you're going to need a Crimping Kit like this one:
Clearly, the rig must be properly made up, so here are some tips on using your bait rigging kit.
Follow these tips carefully and you'll soon be an expert!
Recent Articles
-
Sea Fishing Rods and Reels Must Be Compatible for a Balanced Outfit
Mar 08, 21 08:30 AM
A quality reel fitted to a quality rod doesn't necessarily make it a quality outfit. Your fishing rods and reels have to be properly matched if you're to get the best out of them, and here’s how -
Essential Lure Fishing Tips That All Saltwater Anglers Should Know
Mar 08, 21 04:51 AM
Which single lure fishing tip applies to trolling, jigging, baitcasting, spinning, fly fishing and any other branch of lure fishing? Well, it is the one at the top of this list -
Vital Jig Fishing Tips That You Really Cannot Afford To Miss!
Mar 07, 21 10:20 AM
Essential jig fishing tips to help you select the right lure for successful jig fishing, together with the techniques required to get the most out of your jig fishing outfit



New! Comments
Have your say about what you've just read! Leave me a comment in the box below.